Sunday, October 31, 2010

Road to the Today Show: Part II


Coming to your television soon
Yes, I am still in the process of developing the perfect dessert for the Today Show Thanksgiving contest.  I have always been super detail-oriented and somewhat of a perfectionist, so when I put my mind to something, I can’t submit it until I am completely satisfied with the results.  This is why you can often find me in the Donnelly computer lab until all hours of the night tweaking projects.

In this case, however, my kitchen was the lab.  I’ve spent at least seven hours baking and experimenting over the past week because of my compulsive need to get my “vision” to materialize correctly.  Finally, at on Friday morning, it all paid off!  I made Thanksgiving S’mores that were fantastic!

I decided to stray from the cookie concept because I thought it might be too plain and conventional for the Today Show.  The s’mores idea developed out of my desire to make something simple enough for my readers to execute, yet creative and tasty enough for the judges of the Today Show to appreciate as well.  Add some Thanksgiving elements like cranberry sauce and cinnamon, and you’ve got yourself a winner!  Hopefully…

Now that I’ve perfected all three recipes and chosen which one I’m going to submit, I’ll post them here for you all to enjoy as well.  Try them out and let me know if you think I made the right choice!

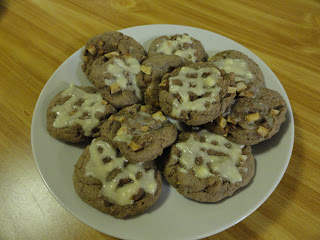
Apple Cinnamon Cookies
Adapted recipe and photos by Culinary Chronicles of a College Kid.blogspot.com
Original chocolate cookie recipe by Giada de Laurentiis

Servings: 2 dozen cookies

Ingredients for the cookies
  • 1 cup of sugar
  • 1 egg
  • ½ tsp vanilla extract
  • 1 stick of butter
  • 2 cups and 2 tbsp. of flour
  • ½ tsp baking soda
  • ½ tsp baking powder
  • ¼ tsp salt
  • ½ tbsp cinnamon
  • 1 tbsp apple pie spice
  • 1 cup finely chopped apples (preferably Fuji)

Ingredients for the sugar glaze
  • ½ cup powdered sugar
  • 1 tbsp softened butter
  • ½ tsp vanilla extract
  • 1 tbsp water

For the cookies:

Preheat the oven to 325 degrees.  Combine the sugar, egg, vanilla, and butter in a bowl and mix well.  In a separate bowl, mix together the flour, baking soda, baking powder, salt, cinnamon, and apple pie spice.  Slowly add the dry ingredients into the bowl with the wet ingredients in three different segments, mixing in between each addition.  Once they are combined, add the apples and fold into the mixture.

Take a tablespoon-sized ball of dough and place it on an ungreased cookie sheet, gently pushing the center down to flatten it slightly.  Repeat the process, leaving about an inch in between each cookie.  Place in the preheated oven for 14 minutes.  Let cool for about five minutes, and then place on a cooling rack for another ten minutes. 

For the glaze:

Add the sugar, butter, vanilla, and water in a bowl and mix well until a glaze consistency is formed.  Drizzle over the cookies and enjoy!


White Chocolate Cranberry Cookies
Adapted recipe and photos by Culinary Chronicles of a College Kid.blogspot.com
Original chocolate cookie recipe by Giada de Laurentiis

Serves: 2 dozen cookies

Ingredients
  • 1 cup of sugar
  • 1 egg
  • ½ tsp vanilla extract
  • 1 stick of butter
  • 2 cups and 2 tbsp. of flour
  • ½ tsp baking soda
  • ½ tsp baking powder
  • ¼ tsp salt
  • ¾ cup dried cranberries
  • 1 cup white chocolate chips
Preheat oven to 325 degrees.  Combine the sugar, egg, vanilla, and butter in a bowl and mix well.  In a separate bowl, mix together the flour, baking soda, baking powder, and salt.  Slowly add the dry ingredients into the bowl with the wet ingredients in three different segments, mixing in between each addition.  Once they are combined, add the cranberries and white chocolate chips and fold into the mixture.

Take a tablespoon sized ball of dough and place it on an ungreased cookie sheet, gently pushing the center down to flatten it slightly.  Repeat the process, leaving about an inch in between each cookie.  Place in the preheated oven for 14 minutes.  Let cool for about five minutes, and then place on a cooling rack for another ten minutes.  Enjoy!


Thanksgiving S’mores
Original photos and recipe by Culinary Chronicles of a College Kid.blogspot.com

Serves: 12 s’mores

Ingredients
  • 2 cups of mini marshmallows
  • 12 graham crackers
  • ¾ cup of cranberry sauce
  • 1 cup white chocolate chips
  • ¼ tsp. cinnamon
First, preheat the oven to 350 degrees.  Then, spread about a teaspoon of cranberry sauce on half of a graham cracker.  Put a few (about 10 or so) mini marshmallows on top of the cranberry sauce, then place the other half of the graham cracker on top.  Place on a baking sheet lined with aluminum foil and repeat the process for the remaining s’mores.

Put the baking sheet into the preheated oven for about 6-7 minutes, allowing the marshmallows to melt slightly.

As these are cooking, set up a double boiler to melt the chocolate.  Place the white chocolate chips in the double boiler and continuously stir until it is completely melted.  (FYI a double boiler is a pot of simmering water with a bowl resting on top of it.  Pour the white chocolate in the bowl and let the steam from the simmering water heat the chocolate.  Make sure the bottom of the bowl is not touching the water).  This will take a few minutes, and the s’mores should be out of the oven and cooling at this point.

Add the cinnamon to the melted white chocolate and mix well.  Frost the top of the s’mores with the white chocolate and cinnamon mixture.  If you prefer to drizzle the chocolate on top, that is effective as well.  Let the s’mores sit for about 45 minutes until the chocolate has fully cooled before plating and serving.  Add some dried cranberries on the plate for presentation!

Think the judges will be impressed?

Wednesday, October 27, 2010

Recipe of the Week: Chicken, Broccoli, and Brown Rice Stir Fry


I didn’t get a chance to go food shopping this week…or last week…so my choices for dinner on Sunday were limited.  My options included toast, cereal, Campbell’s soup, or brown rice.  I knew I had some frozen chicken somewhere in the back of the fridge and a head of broccoli that may or may not have been past its expiration date.  It was time to get creative.

Of all of the things I mentioned, only the chicken, broccoli, and rice seemed reasonable enough to include in a recipe, so I decided to throw them altogether in a skillet.  I figured I could add a few spices here, some lemon juice there, and the dish would be fail proof.  Usually, when I come up with these seemingly fantastic ideas in my head, they don’t translate very well onto the plate.  This time was the exception, however.  The stir fry came out great!  I couldn’t believe I was successful and I was so proud of my culinary genius.  Clearly, this dish fed my stomach AND my ego.

Chicken, Broccoli, and Brown Rice Stir Fry
Original recipe and photo by Culinary Chronicles of a College Kid.blogspot.com

Serves: 3

  • ¾ of a small head of broccoli
  • 1 chicken breast
  • 1 14oz. can of chicken broth
  • 1 garlic clove
  • 2 oz. of water
  • 2 tsp. lemon pepper seasoning (or something similar)
  • 1 cup of brown rice
  • olive oil
  • lemon juice
  • salt and pepper to taste
  • large plastic bag

Woops, forgot the chicken! It was marinating..

Start by defrosting the chicken breast (let sit at room temperature for about two hours before starting to cook) and cutting into small cubes.  Then, pour a small drizzle of olive oil into the plastic bag along with a tablespoon of water.  Add the lemon pepper seasoning, a squirt of lemon juice, and a pinch of salt and pepper into the bag as well.  Put the defrosted chicken into the plastic bag with the mixture and let it marinade in the fridge for at least ½ hour.


As this is marinating, pour the water, chicken broth, and rice in a large pot over medium heat.  Cover with a lid so that it cooks faster.

After the rice has been simmering for 20 minutes, place a large skillet over medium heat and lightly coat the bottom with olive oil.  Chop the clove of garlic into fine pieces and add to the skillet.  The garlic will brown fast, so be sure to spread it around as soon as it hits the heat.

The chicken should be finished marinating, at this point, and will be ready to add to the skillet.  Take it out of the fridge and gently add the pieces of chicken onto the skillet.  Be cautious of hot oil splashing out of the pan as the chicken is added…I would know.

Don't make fun of my apron

Keep moving the chicken around in the pan, using a large spoon, to make sure that it is evenly cooked.


After about five minutes, add the broccoli and keep stirring.  If you feel that the pan is too dry, add a little more olive oil.  Be careful not to add too much, though, as the rice will add some moisture as well.  Let the broccoli cook for a few minutes, then check on the rice to see if it is ready.  You will know that it is ready to be added to the skillet when all of the liquid has been absorbed into the rice.  If the rice is ready before the chicken and the broccoli, take it off the burner and let it sit until it is ready to be added.  Timing is the only tricky part of this recipe, so be alert.

Carefully pour the rice over the chicken and broccoli in the skillet.  Mix well then sprinkle with some more lime juice, salt, and pepper.  Enjoy!

As I mentioned earlier, I love this recipe.  From now on I will make sure to always have some broccoli, chicken, and rice on hand so that I can make this as my default dinner when I’ve got nothing else.  You should too!  I promise it won’t let you down and it’s not as difficult as it may seem.

The only drawback for this recipe is that it doesn’t take five minutes to prepare, like most of my posts.  It took some extra time to marinate the chicken and cook the rice, but I’m telling you it was well worth it.  It’s great for a Sunday night when you have a little more time to spend in the kitchen, and are ready for a hearty, energizing meal before the week starts.  Plus, this recipe makes about three servings.  If you don’t plan on sharing, save it for leftovers during the week.  It may take that extra twenty minutes to prepare, but you’ll end up getting three meals out of it.  Spend the time on Sunday, and save the time during the week!

Total time: 35 minutes plus prep for chicken
    

Saturday, October 23, 2010

Road to the Today Show

I’ve recently decided to become more responsible and catch up on current events now and then, so I occasionally turn on the Today Show while getting ready in the morning.  Except I wake up too late to catch the real news stories, and end up watch the last segment of “Kathy Lee and Hoda,” which is mostly lifestyle and entertainment news.  I don’t know much about the upcoming elections or the economy, but I can tell you all about how to train your dog properly or how to order wine at a pricey restaurant.

In my defense, however, my attempt at being a grown up did result in the discovery of a potentially amazing opportunity.  Kathy Lee and Hoda informed me that The Today Show is hosting a contest for viewers to submit their best Thanksgiving side dishes or desserts.  Three lucky winners get the chance to prepare their winning recipe on the show!  Talk about great PR for the blog!  Being a cooking enthusiast with an enormous sweet tooth, I was instantly excited by the challenge.  Picturing myself on TV next to Kathy Lee Gifford talking about my own recipe was all the motivation I needed to get cooking.

I love all things sugary, so I decided to come up with a Thanksgiving dessert that was festive and creative.  I started by throwing out crazy ideas involving pumpkin, cranberry, and apple flavors, and narrowed it down from there.  Apple pie cookies with a sugar glaze and white chocolate cranberry sandwich cookies with a cranberry and macadamia nut frosting filling were the final two that made the cut.

Two straight nights of experimenting resulted in this:

First attempt at apple pie cookies.  Runny batter, ick

Mess

I added an extra cup of flour because the batter was so thin, and ended up with a cake texture insted of a sugar cookie.  Good, but not what I was going for.

I decided to change the recipe altogether and they came out MUCH better. 


Failed attempt at the white chocolate cranberry cookies.  They were hard as rocks and the chocolate burnt instead of melted.  Still working on that one...

I plan to continue perfecting my recipes tomorrow night, and then I’ll make the final decision on which cookie I will choose.  I’ll post both recipes as soon as I get them right!

In the mean time, which idea is your favorite so far?  I’d love any kind of feedback or criticism!

Thursday, October 21, 2010

Fancy Grilled Cheese


I’ve been craving this classic lately but was looking to put an interesting new twist on it.  So, as I start with most of my cooking ideas, I Google searched some creative ways to make grilled cheese a little fancier, but just as easy.  This particular recipe from Tyler Florence, Food Network star and host of “Tyler’s Ultimate,” caught my eye because the ingredients were very different and they could all be found in my fridge.  The combination of the sour apples and the salty bacon was surprisingly delicious, and the extra kick from the Dijon mustard was unexpected but tasty as well.

Fancy Grilled Cheese
Adapted recipe and photos by Culinary Chronicles of a College Kid.blogspot.com
Original recipe by Tyler Florence

Serves 1

  • 1 cup grated cheddar cheese
  • 2 slices whole grain bread
  • 1 Granny Smith apple, peeled and thinly sliced
  • 2 strips bacon
  • Dijon mustard
  • Butter

Place a skillet over medium heat to warm up.  Cook the bacon according to package instructions.  Spread the mustard on one slice of bread, then top with cheese, bacon, apple slices, and more cheese. 


Place the second piece of bread on top of the sandwich and spread butter on the top of the bread.  Place the sandwich, butter side down, onto the heated skillet.  Press down with a spatula and wait till the bottom turns golden brown.  As you are waiting, spread more butter on the bread that is facing up.  Flip the sandwich over and allow the other side to cook.  When both sides are golden brown and the cheese is melted (about 5 minutes), take the sandwich off of the skillet and enjoy!

Jorge's boring version with just cheese and bacon.  Apples "make his teeth hurt."
This really is a great recipe and I would definitely recommend it if you are a grilled cheese fan.   This version was just as easy and ten times more flavorful.  It took about five minutes longer than making a plain grilled cheese, but the huge difference in taste was worth it.  Plus, it’s five more minutes used to procrastinate from doing work!

Next time I think I might try honey mustard instead of Dijon to see if the sweet and savory makes a good combination.  Try it out and let me know what you think!

Total time: 10 minutes

Tuesday, October 19, 2010

Recipe of the Week: Mexican Rice Quesadillas


I have a few cooking blogs that I read religiously because one, I love everything to do with food, and two, I aspire to be as awesome of a cook as some of these bloggers!  I recently came across a recipe for Mexican Rice Quesadillas that looked DELICIOUS, but a little complicated.  The Mexican tomato rice and beans were homemade and involved about a million ingredients that I don’t think I could find even if I scoured every student kitchen on the Marist campus.  I knew there was no chance of me having the time or the money to recreate that, so I figured Uncle Ben would probably have a reasonable alternative for me.  And I was right!  I scooped that Sante Fe style rice off of the shelf in aisle nine quicker than you could imagine.

My housemates decided to skip out on family dinner this week and go to Applebee’s instead, but it’s okay because they definitely regretted it after they saw my yummy homemade creation.  They missed out, but you shouldn’t…try this recipe tonight!

Mexican Rice Quesadillas
Adapted recipe and photos by Culinary Chronicles of a College Kid.blogspot.com
Original Recipe by For the Love of Cooking.net

Serves 1

  • 2 tortillas (I suggest whole wheat if you want a little more flavor)
  • 1 cup Monterrey Jack cheese, shredded
  • 1 package Uncle Ben’s Sante Fe rice
  • Cooking spray


Heat a frying pan or skillet over medium heat and spray with cooking spray.  Cook the rice according to package instructions.  Spread half of the cheese over one of the tortillas (I used Monterrey Jack instead of the recommended Cheddar because I thought it would be more festive, ha).  Place the rice on top of that, and then sprinkle the rest of the cheese on top of the rice.


Place the second tortilla on top of the first, and then place on the heated skillet.  Once the bottom is golden brown, flip it over and let the other side cook.  The quesadilla should be done after a total of about four minutes on the skillet.  Let cool for a minute or two before cutting into slices.

Kim was the only housemate around to try them and she had no comment except "good."  They left her speechless :)
Kerry: "Oh those look so good!  I wish I didn't ditch family dinner night for Applebee's." Okay, she didn't actually say that, but I could read it on her face...
These were so good and so easy that I will most likely be making some kind of quesadilla variation again during the week.  Check back soon for another idea on how to use up the rest of your tortillas!  Hint…it may involve some grilled fruit (peaches?) and chicken.

Total time: 8 minutes…seriously

Thursday, October 14, 2010

Cinnamon Crescent Rolls with a Sugar Glaze


Looking for a morning treat to satisfy your sweet tooth?  I’ve found the solution!  Put down the Cinnamon Toast Crunch and follow this recipe for an easier version of a breakfast classic.  I made these cinnamon crescent rolls for my Monday morning class and it was just the energy boost we needed to keep us awake.  All but one was gobbled up!

When I first found this recipe, I had flashbacks to eating the REAL cinnamon rolls (the giant ones with tonsss of icing) on special occasions when I was a kid.  Whenever we had a snow day, a half a day of school, or birthdays, I would wake up to the smell of cinnamon and sugar and SPRINT to the kitchen to claim the gooiest roll in the batch before my sisters did.  This time, the roles were reversed, as my housemates were the ones flocking to the kitchen to get their hands on these fancy crescent rolls.  If a recipe can drag a bunch of college kids out of bed at 8:30 a.m., you KNOW it must be good!

Cinnamon Crescent Rolls with a Sugar Glaze
Adapted recipe and photos by Culinary Chronicles of a College Kid.blogspot.com
Original recipe by For the Love of Cooking.net

Makes 16 rolls

Cinnamon Rolls
  • 2 packages of crescent rolls
  • 2 tbsp butter
  • ½ cup granulated sugar
  • 4 tsp cinnamon
Glaze
  • 1 cup powdered sugar
  • 1 tbsp unsalted butter, softened
  • 1 tsp vanilla extract
  • 1 tbsp milk
Preheat the oven to 375 degrees.  Combine the cinnamon and the granulated sugar in a small bowl and mix well.  Unroll the crescent rolls and place on an ungreased cookie sheet.  Spread a thin layer of butter on each roll and top with the cinnamon and sugar mixture.  Tip: Don’t afraid to be generous!  The crescent dough puffs up in the oven and will overpower the cinnamon and sugar flavor unless you use a heavy hand.


Roll the dough up from the largest end to the smallest.  Top each with another thin layer of butter and the cinnamon and sugar mixture.  Place in the oven for about ten minutes or until the rolls are golden brown.


While the rolls are cooking, combine all the ingredients for the glaze in a bowl and mix well until a smooth consistency is formed.  Pour this glaze over the rolls just before serving.


I unfortunately did not have time to make the glaze for my class that morning, as one of my classmates graciously called me out on, but I appreciated the feedback and would love to hear what YOU think of this recipe as well!  Please comment and tell me how yours came out!

Total time: 25 minutes

Tuesday, October 12, 2010

Recipe of the Week: Butternut Squash Ravioli with a Brown Butter Sauce


I realize I’ve been slacking on the recipe of the week that I had previously promised every Monday, but this week’s recipe is SO good that hopefully it makes up for it!  Yesterday I made butternut squash ravioli with a brown butter sauce, yum.  Sounds fancy and complicated, doesn’t it?  Well fancy it was, but surprisingly it was also one of the easiest dishes I’ve made yet. 

I had been craving this dish ever since I had a similar version of pumpkin ravioli last fall at a great restaurant called Terrapin in Rhinebeck, New York.  If it sounds familiar, that is probably because you heard about it over and over again in the news as the site of Chelsea Clinton’s rehearsal dinner.  So you KNOW it was top-notch!  The flavors in this dish are perfectly festive for the fall season and the presentation is beyond impressive.  My mouth is watering just describing it to you…

Here’s the secret: store bought ravioli from a real Italian deli (I got mine from Rossi’s in Poughkeepsie) and a simple brown butter sauce recipe from Food Network star and renowned Italian chef,  Giada de Laurentiis.  

Butternut Squash Ravioli with Brown Butter Sauce
Adapted recipe and photos by Culinary Chronicles of a College Kid.blogspot.com
Original sauce recipe from Giada de Laurentiis

Serves 3

  • 1 pack of 12 fresh, store bought butternut squash ravioli
  • 1 stick of butter
  • 2 tbsp torn fresh sage leaves
  • ½ cup dried cranberries
  • ¼ tsp salt
  • ¼ tsp pepper
  • grated parmesan cheese for garnish


Place a pot of water on the stove over high heat.  As you are waiting for this to boil, place a large frying pan over medium heat.  Put the butter in the frying pan and move it around until completely melted.  Once this is done, add the cranberries and sage and let this cook until the butter starts to brown (about 4 minutes).  Turn the heat under the skillet off and season with salt and pepper.


Once the water begins to boil, add the twelve ravioli and gently stir so that none of them stick to the bottom of the pot.  Keep a careful eye on the pot, as fresh ravioli usually takes less time to cook (about 4 minutes).  The raviolis are finished cooking once they rise to the surface.  Turn off the heat and gently remove the ravioli from the water, one by one, using a slotted spoon. 

Distribute the sauce over each portion and sprinkle with parmesan cheese.

Jorge thinks it tastes like Halloween...I said Fall.  Same thing.
But both agreed it was our favorite meal as of yet!
P.S. Those black dots are actually delicious cranberries. My camera is the worst.
The original sauce recipe called for 1 ½ sticks of butter, but I found this to be too much and would recommend using only 1 stick, as I stated under ingredients.  Walnuts were also a part of the original recipe, but a few of my housemates are plagued by nut allergies.  Too bad, I bet they would have tasted delicious with the squash and cranberries.  If you are interested, add ½ cup of walnuts and let me know how it tastes!

Total time: 12 minutes

Sunday, October 10, 2010

Midterm Munchies


Believe it or not, Marist students are almost halfway through the semester and midterms are just around the corner!  Where did the time go?  To help you prepare for your exams, I’ve done a little research on the best “brain foods” to eat while studying to give you the extra energy boost you're going to need.  I found some facts that I was pleasantly surprised with, considering the best foods to eat during this stressful time are actually delicious and waaaaay more satisfying than Red Bull.

The Health section of the Directory Journal has listed the top ten foods that are proven to enhance memory and your ability to focus here:  http://www.dirjournal.com/health-journal/top-10-brain-foods/

From these top ten suggestions, I’ve come up with a few recipes and snack ideas that are sure to keep your brain from frying over the course of the week.  Most of these can be prepared ahead of time so that you won’t have to take time away from studying during the week.  So get cooking! Your grades depend on it!

1. Blueberries


They have lots of antioxidants…I think that’s the secret.  I’m not really into all that scientific stuff so I’ll trust the professionals on that.  But I do know is that they are good, especially in smoothies!


Basic Blueberry Smoothie
Recipe by Culinary Chronicles of a College Kid.blogspot.com

Serves 1

  • 1 cup blueberries
  • ½ cup skim milk
  • ¾ cup non-fat vanilla yogurt (6 oz.)
  • 3-4 ice cubes
Place all ingredients in a blender and blend on high until smooth.  My housemate recently bought a Magic Bullet, after seeing the infomercial late one night, and loves it, surprisingly.  If you happen to have one of those lying around, that would work instead of a blender as well.

Tip: Frozen blueberries, if available, make this recipe even better because it eliminates the need for ice cubes and makes the smoothie much creamier!

If you haven’t got a blender, as many college kids don’t, worry not!  There are plenty of other ways to get your antioxidant intake.  Blueberries and yogurt with a little granola on top is delicious and as close to a smoothie as you can get without the blender.  Or, simply grab a handful of blueberries and put them in a plastic baggy before heading to the library.  That’s what is great about this fruit, you don’t need a recipe to enjoy them!

2. Coffee

Caffeine, obviously, is essential for getting through those late night cramming sessions.  However, loading your beverage with all of those sweeteners and creams turns this study necessity into an unhealthy habit.  I’ll show you how to make your coffee taste as good as Starbucks AND help you pass your exams, without ruining your diet.

Low-fat Frappuccino
Recipe by Culinary Chronicles of a College Kid.blogspot.com

Serves 1

  • 2 tbsp instant coffee
  • 1 cup water
  • 1 tsp sugar or Splenda
  • ¾ cup skim milk
  • 7 ice cubes
  • 1 tbsp chocolate syrup (optional)
Heat water over the stove or in the microwave and add instant coffee.  Mix sugar into the coffee until dissolved.  Next, add three of the four ice cubes to cool the coffee to about room temperature.  Pour the cooled coffee, milk, remaining four ice cubes, and chocolate syrup (if desired) into a blender and blend until smooth and the milk becomes frothy at the top.  Pour into a tall glass and enjoy!

Again, if you don’t have a blender or find too many similarities between instant coffee and mud, I have a solution!  It’s called the Melitta, non-electric coffee maker and it’s AWESOME.  I recently caught my housemate using it to brew her morning cup of jo and was amazed, mostly because I had cleaned this plastic contraption numerous times while I was on dish duty and decided it was probably a strainer of some sort.


Place the Melitta plastic coffee maker on top of your cup of coffee with a cone shaped coffee filter inside.  Put two tablespoons of your favorite coffee grinds into the strainer, then pour one cup of hot water over the coffee grinds in very small increments.  It is important not to pour all the water over the coffee at once, as this will produce a very weak cup of coffee.


Ta-dah!  A great cup of coffee made from a piece of plastic as opposed to a $50 electric coffee maker.  I can’t think of anything quicker, easier or cheaper.  It is definitely a college necessity, in my book.


Or, check your local Target, Wal-Mart, or K-mart to see if they have any in stock.

3. Nuts


Nuts contain “mood-enhancing neurotransmitters.”  Sounds pretty important! Like blueberries, nuts can be enjoyed by themselves without the need for any fancy recipes, especially when you have midterms to worry about.  Grab a handful of peanuts, almonds, pecans…whatever nut you like, and bring them over to the library.  Or, if you want something a little more interesting, how about a homemade trail mix?

Trail Mix
Recipe by Culinary Chronicles of a College Kid.blogspot.com

  • Peanuts/Almonds (or both!)
  • Raisins/dried cranberries
  • Goldfish
  • Pretzels
  • Chex cereal
  • Chocolate chips/M&M’s (in moderation)
Combine equal parts of the ingredients in a large bowl and mix well.  You can add as much or as little as you want, depending on how much trail mix you would like for the week.  I would suggest using less chocolate chips or M&M’s, if at all, as too much turns this brain healthy snack into dessert.

Peanut butter is also a great way to get your nut intake for the day.  Pack a peanut butter and banana sandwich, or smear a little bit on apple slices for a nutritious snack!

4. Dark Chocolate


At least midterms gives us an excuse to eat tons of candy and chocolate. We need all that sugar to stay awake, right?  Kind of.  Chocolate is proven to be great for focus and concentration, but only the real stuff.  Dark, at least 60% real cocoa, is the kind of chocolate I’m talking about.  A few small pieces of real dark chocolate can go a long way when you reach hour five in the library.  Sipping on a chocolatey treat, if you prefer hot chocolate, is great too!  Try this dark hot chocolate recipe to satisfy your sweet tooth and stay focused.

Dark Hot Chocolate
Adapted recipe by Culinary Chronicles of a College Kid.blogspot.com
Original recipe by Rachel Thebault, owner of Tribeca Treats

    • 2 cups granulated sugar
    • 1 cup dark chocolate cocoa powder
    • one vanilla bean (optional)
    • 1 handful of pure dark chocolate chips
    • milk
Combine all ingredients in a large bowl and stir until mixed evenly.  To separate the vanilla beans from the pod, cut a line down the center and scrape the inside out into the bowl.  Watch the video below for a demonstration.

Add two tablespoons of this mix per one cup of warm milk for a single serving. This mix makes about twenty servings of hot dark chocolate.

Here’s the how-to video from the professional herself!


5. Eggs & Broccoli

According to the Directory Journal, broccoli helps slow the aging process.  Stay young longer?  I’m pretty sure that’s every college kid’s dream.  Broccoli by itself can be a little bland, but adding it to ANOTHER brain healthy food like eggs is a lot more interesting.  Eggs, broccoli, and a little cheese are all you need to make a hearty omelet that will keep you focused all day!


Broccoli Omelet
Recipe and photos by Culinary Chronicles of a College Kid.blogspot.com

Serves 1

  • ½ cup chopped broccoli
  • 2 large eggs or ½ cup of egg beaters
  • ¼ cup milk (if using eggs instead of egg beaters)
  • ¼ cup of your favorite cheese, shredded
  • salt and pepper to taste
  • cooking spray
  • frying pan with non-stick coating
  • spatula

Place the pan over medium heat and spray with cooking spray.  If you are using 2 large eggs, crack them in a bowl with the milk and whisk until mixed.  If using egg beaters, milk is not necessary.  Add a pinch of salt and pepper, then pour the egg mixture or the egg beaters into the heated pan.

Let the eggs cook until edges start to stiffen and the bottom begins to brown slightly.  At this point, carefully use the spatula to flip the omelet so that the top side can cook.  Next, put the cheese on half of the omelet and top with the broccoli.

Once the bottom of the omelet is cooked, fold the uncovered half of the eggs over the half that is covered with cheese and broccoli.  Let this cook for another thirty seconds or until the cheese is melted.  Then, take your omelet off of the heat and put on a plate.

Power Combos

For a super energy boost, combine some of these brain healthy foods like I did with the omelet.   Dark chocolate covered espresso beans or dark chocolate covered almonds are perfect examples. It is probably best to have these snacks in moderation, though; because it’s true they aren’t the best choices in terms of calorie count.  Mix and match whatever you like, and be sure to let me know about your creations. I’m always looking for inspiration!

After Party

And now, a little treat for after you ace all of your exams…Cherry Bombs.  This fruity cocktail is not too sweet and extremely refreshing.  Pour a glass for you and your friends to unwind and celebrate after a long week. Emphasis on after 

Cherry Bombs
Adapted recipe and photos by Culinary Chronicles of a College Kid.blogspot.com
Original recipe by Sunny Anderson of the Food Network’s “Cooking for Real”

Serves 4

  • 4 tbsp lime juice
  • mint leaves
  • 2 cups black cherry juice OR black cherry soda
  • 8 oz. gin
  • 1 cup seltzer (if using juice instead of soda)
  • 3 ice cubes
Muddle, or crush, mint leaves at the bottom of a tall glass.  Add ice to the glass.  Pour lime juice, black cherry juice or soda, gin, and seltzer (if using juice), into a separate glass and mix well.  Pour this mixture over the ice and mint and stir again.

And, as always, drink responsibly!

Hopefully these ideas will inspire you to take just a few minutes out of your busy schedule this week to whip up some quick snacks that will really make a difference in your productivity.  It is so important to remember to eat healthy, even when your hectic schedule doesn’t allow much time and especially when your grades are on the line!  Good luck everyone!